Learn to Handstand ! Routine & Progression
Hi there,
Want to learn handstand and get the best routine possible? Perfect, you're at the right place!
This article aims to provide you with a highly applicable routine, which will remove any hesitation and enable you to take immediate action with confidence.
Let's go 💪
Routine Force
There are some very common mistakes when learning the handstand that slow down progress enormously.

A common mistake is to try to stand on your hands without enough strength in arms, shoulders and the rest of the body to simply stay upside down without managing balance.
In my opinion, to do things right, limit the risk of injury and lay a solid foundation, you must first be able to stand upside down, with your back to or facing the wall, for at least 20 to 30 seconds. 
The first routine is designed to reinforce this objective. For this, you need to be able to do a dozen clean push-ups. 5 pull-ups and dips would be ideal, as well as good overall strengthening. However, if you're only interested in Handstand , the second routine in this article is the one for you.
Joint warm-up for the Handstand
For a specific warm-up, prepare your wrists and shoulders well. Here are a few exercises to incorporate systematically before each session to improve your performance and reduce the risk of injury:

Exercises to learn and master Handstand
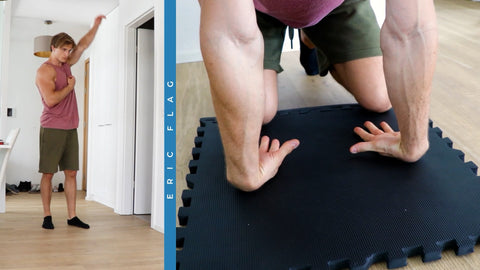
Ex 1 : Pike pump
First exercise: do pike push-ups on the floor. Do 3 sets of your maximum minus 2 reps, i.e. stop about two push-ups before failure.
Take between 1min 30 and 3minutes rest between sets to maintain your performance. To adjust the difficulty, move your feet further back to simplify the push-ups or move them forward to make them more difficult.


Choose a position that's difficult enough not to exceed 10 repetitions. Plunge well forward and keep your elbows close to your body. You can also replace push-ups with dips, or alternate between the two every week.
Ex 2 : Progression Handstand Assisted

Second exercise: the handstand assisted progression. Start in the pike position with your feet slightly elevated, then gradually increase the height, for example by placing them against a wall at hip height.
Finally, move to the upright position, with your body straight and close to the wall.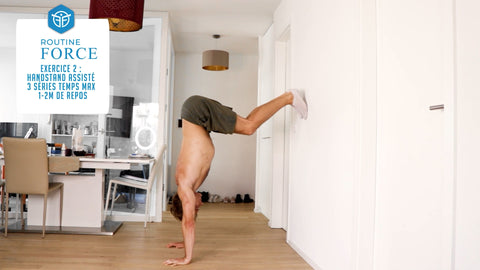
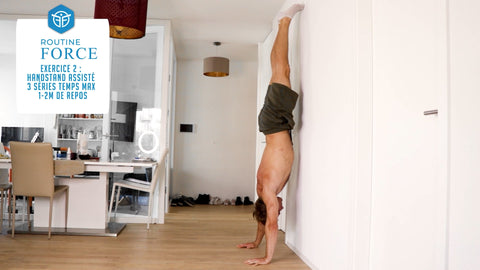
Do 3 sets, holding your maximum time, while conserving enough energy to descend safely. Once you've managed to hold the position for 30 seconds in the first set, move on to a more difficult progression in your next session.
Ex 3 : Frogstand

Third exercise: the Frogstand, which will help you develop your initial balance. Perform 2 or 3 sets, holding your maximum time. The closer you bring your knees to your arms, the more difficult the exercise will be.

Ex 4 : Hollow body circuit
Fourth exercise: a sheathing circuit. Start with the Hollow Body, keeping your lower back on the ground, then move on to the Hollow Body on the sides, with no rest between changes. Finish with the Superman on the stomach until you fail. Rest for 1-2 minutes and repeat 2-3 times.


Ex 5 : Pikes + Shoulder blade dips

For the fifth exercise, link a series of pike push-ups to your maximum with scapula dips, keeping 1 to 2 seconds of contraction at the top of each repetition. Repeat this circuit once if you wish.
Perform this routine around twice a week to complement other back and leg workouts. As soon as you can hold the wall for 20-30 seconds, you'll be able to concentrate seriously on Handstand.
Frequency and programming routine Handstand
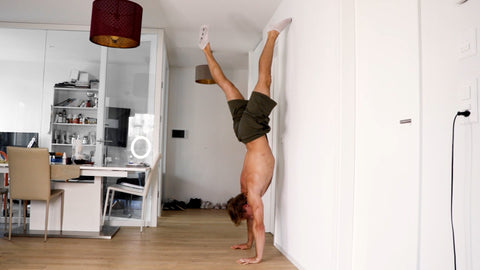
ROUTINE HANDSTAND V1: THE WALL
The wall may seem boring and tiring, but it's crucial to mastering Handstand. It's a bit like ignoring calories when you want to gain muscle or lose fat: it may work, but it's risky and difficult to reproduce.
To progress quickly, spend as much time as possible near the wall. This balancing routine is simpler than the first and consists of a single exercise, but can be adapted to your level. It involves making assisted Handstand attempts with the wall, using a special technique.

To progress, alternate between handstands facing the wall and with your back to it. The Handstand with its back to the wall can seem intimidating at first and requires greater mobility.
Here's the technique:
When you're in position, avoid kicking to get off the wall. It's an unpredictable method. To maintain balance, think about balancing on your feet: when you fall forward, you push on your toes. At Handstand, constantly push on your fingers, adjust the pressure, and use your lower palms if necessary.


The rest of the body must be adjusted to keep the mass above the center of the hands or slightly towards the fingers.
You can also work on your Handstand on parallel bars, which are gentler on the wrists and help manage front and back imbalances, making the Handstand easier to master with practice.

To begin with, keep your legs straight with one against the wall. Grow taller by pushing up on your shoulders and contracting your abs, buttocks and legs.
Next, gradually move your center of mass away from the wall by moving your shoulders and upper body, while moving your other leg away from the wall.
Do this gently and with control until you feel your foot want to come off the wall. At this point, use your hands to maintain balance: push on your fingers or palms to return against the wall.
Learn to bend your fingers at the middle phalanx to push with more force.

This method helps your brain to consciously create balance. Over time, you'll get closer to the balance point and learn to manage the pressure on your hands to hold a little without the wall before returning. Avoid falling forwards or backwards, and push with your hands to get back to the wall.
Do 4 to 8 alternating sets with your back to the wall and your front to the wall, each for 10 to 30 seconds. Increase the number of sets if you're still productive despite fatigue. When you've managed to last 3 seconds or more without the wall, add an extra exercise: learn to jump Handstand.
ROUTINE HANDSTAND V2: LEARNING TO JUMP
Jumping on Handstand is technical and requires practice. The wall helps reduce fear and serves as a landmark. Alternate between jumping too far and not far enough to optimize your learning. Gradually move away from the wall to improve your balance.
Spend 5 to 10 minutes practicing the jump, experimenting and resting as needed. If you're too tired after the exercises against the wall, start with the jumps and finish with the wall.
BALANCE ROUTINE V3: FREE ATTEMPTS HANDSTAND

After enough sessions, you'll be ready to try Handstand without walls!
Set yourself a time limit of 5 to 20 minutes for the trials, concentrating on holding several seconds of balance. Always finish with assisted sets against the wall to maintain a good workout time. Follow this method, and you'll see steady progress, with just a few more sessions to go before you succeed!
Training frequency Handstand
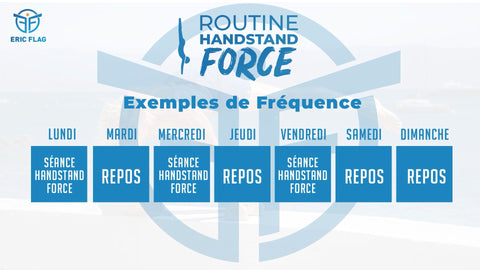
The frequency of your balance routine depends on your experience with Handstand and sports in general. If you're just starting out, you'll be able to train more often.
On the other hand, if you already have a busy training routine or other sporting goals, it's best to reduce the frequency. I recommend doing this session at least 3 times a week, but you can increase to 5 or 6 times a week depending on your situation.

Listen to your body and give it the rest it needs. If you're involved in other sporting activities, train at Handstand beforehand, when you're still fresh. With experience, fatigue will diminish. The key is total training time per week: opt for 3 sessions of 35 minutes rather than 6 of 15 minutes, which require more time for warm-up.
Here's a practical summary:


If you're looking for a complete 5-month program to optimize your routine and strengthen your body, including tricks like the L-sit or the Muscle-up, discover my program Street Workout Evolution
That's all for this article! I hope you enjoyed it 🔥
To progress effectively in different exercises, having a home gym allows you to train regularly and safely.
In the meantime, train well and take care of yourself!
See you soon 😄
Eric Flag

1 comment
Hello Eric,
Thank you for these tips and exercises for learning Handstand.
of Rambures
Leave a comment
This site is protected by hCaptcha, and hCaptcha's Privacy Policy and Terms of Service apply.